Viewer/Projector Setup
 Presentation Manager uses a window called 'Presentation #1' (image viewer) to display on the
projector. When Presentation Manager is run for the first time this window will
need to be setup before anything can be displayed on the projector
screen.
Setting the viewer window automatically
if you have successfully setup dual display on your computer then you will be
able to automatically setup the Presentation 1 screen on your projector.
-
Begin by clicking the edit button on the toolbar
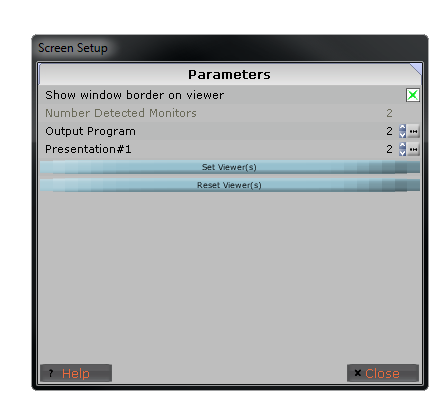
- Click on the "Screen Setup
- Use the "Presentation #1" on the property page to select
which monitor you want the viewer to display on.

-
Click the "Set Viewer(s)" button to apply the change you have just
made, setting up the Presentation #1 window on your projector.
-
Once the viewer is setup on the projector you will need to save the
workspace so you will not need to setup the viewer again next time you
run Presentation Manager. Click the save button on the toolbar to
save the workspace.
Resetting the viewer window automatically
-
you can click the "Reset Viewer"
button to bring the Presentation #1 window back onto your computer
screen. It will turn the borders on the viewer.
Resetting the viewer window manually
If you cannot get the viewer window to setup on the projector screen
automatically it can be done manually as well.
-
To setup the viewer manually open the presentation #1 window on your
computer and drag it off your screen to the right. If your dual
display is setup properly you will see the Presentation #1 window appear
on your projector screen. If your dual display is not setup
properly you will not be able to drag the Presentation #1 window off your screen.
-
Once the window is on the projector, maximize it either by dragging the corners
until it fills the screen, or by using the maximize button on the windows toolbar.
-
Once the projector screen is setup you will want to take the border off the viewer.
To do this uncheck :Show border in viewer
-
When you are finished you will want to
save the workspace so you will not have to setup the projector screen
again the next time you load the software. Click the save button
on the toolbar.
Setting the Preview Aspect Ratio
Setting he XSize/Aspect to 4 and the YSize/Aspect to 3 and then pressing Set Preview Aspect
keep the preview aspect ratio to 4:3
Setting he XSize/Aspect to 16 and the YSize/Aspect to 9 and then pressing Set Preview Aspect
keep the preview aspect ratio to 16:9 (ie HD)
Alternative the user can read the current aspect ratio of the viewers (Presentation#1) and
the set the preview to this size.
Setting he XSize/Aspect to 0 and the YSize/Aspect to 0 and then pressing Set Preview Aspect
keep the preview aspect ratio to the current size as defined by the layout
The screen Type is left at LCD/Progector. LED if for future mini display support

 Presentation Manager uses a window called 'Presentation #1' (image viewer) to display on the
projector. When Presentation Manager is run for the first time this window will
need to be setup before anything can be displayed on the projector
screen.
